Keep your kitchen running smoothly with our Top-Notch Fryer Cleaning Services. We provide thorough, reliable cleaning to ensure your fryers are safe,efficient, and always ready for use.

Florida Kitchen Pros is a value addition that covers all 360 services under one platform. Our motive is to provide best services to our corporate, commercial, and residential customers. Our main key components to success are .

We ensure top-tier cleaning for your fryers.

Thoroughly cleaning the fryer basket and interior

We replace or filter oil to maintain fryer efficiency

Eliminate all grease build-up from the fryer surfaces

Removing stubborn food remnants from every part

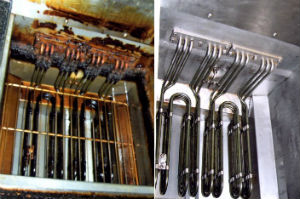
Scrubbing fryer interiors, heating elements, and filters.
Cleaning the vents and exhaust to improve air quality

Ensuring your fryer is clean and safe for use
Maintaining the operation of your industrial kitchen calls for attention to numerous aspects, and cleaning your deep fryer is among the most important chores. A neat deep fryer guarantees that your fried food stays delicious and that your kitchen is safe and effective. Ignoring this step could result in bad-tasting food, a smokey kitchen, or possibly even possible fire concerns.
Frank, the happy owner of Florida Kitchen Pros, stresses how the success of a commercial kitchen depends on regular maintenance of kitchen equipment. Frank’s precise direction has helped us to compile this useful manual to bring you through the exact method of thoroughly and quickly cleaning a deep fryer.
Whether you’re fried crispy golden fries, tempura, or mouthwatering samosas, deep fryers are at the center of any commercial kitchen. Frequent cleaning has several advantages.
Knowing the reasons behind the need of cleaning your deep fryer will help you to get right to work.
To ensure a flawless process before you leap in, compile the following tools and cleaning supplies:
Depending on how often you maintain your fryer cleaning, set aside one to two hours after you have all your tools to finish the cleaning operation.
Your business deep fryer can be cleaned from top to bottom like follows:
First turn off and cool down.
Safety comes first! Turn off the gas supply or cut off your fryer from the electrical outlet. Let the oil totally cool; this normally takes around sixty minutes. Cleaning a fryer while it is still hot should never be done since this could cause burns or mishaps.
Second step: empty the oil.
Carefully drain the cooled oil into a separate bucket or container. Like Florida Kitchen Pros, several companies advise using local waste management companies to appropriately recycle or dispose of spent oil.
Pro Tip: Steer clear of putting oil down drains since it will contam the environment and clog pipes.
Third step: scrape and clear residuals.
Gently remove burned food bits and solidified fat from the fryer walls and bottom with a scraper. Reaching difficult areas is best accomplished using a long-handled frying brush.
The fourth step is applying a degreasing solution.
Use a commercial fryer cleaner or degreasing solution meant especially for kitchen tools. Following package directions, mix the solution with warm water. Give the fryer’s inside surfaces plenty of it.
Give the mix ten to fifteen minutes to soak. Any tough grease accumulation will be loosened by the degreaser.
Step 5: Rinse and Scrub
Use your cleaning brush to thoroughly cleanse the fryer walls, heating elements, and other parts once the fat has loosened. A smaller brush or toothbrush can be quite helpful in hard-to-reach locations.
Run the fryer completely under warm water to make sure all cleaning agents are flushed out.
Step 6: Address Resilient Stains
Florida Kitchen Pros advises a homemade mixture of baking soda and water or white vinegar for tough grease stains. Apply this paste to tough stains; gently scrub; then rinse.
Step 7: Exchange the Fryer Basket.
Though sometimes overlooked, the fryer basket is equally as crucial for cleanliness. Submerge it in the soapy degreasing solution and wipe away leftovers. Rinse completely; lay it aside to air dry.
Step eight: dry and reassemble.
Fully dry the fryer with lint-free microfiber cloths. Excess moisture could cause oil to boil incorrectly; thus, make sure all parts are dry. Reassemble your fryer once dry, then it’s ready for fresh oil.
Step 9: Run a test.
After refilling the fryer with fresh oil, turn it on and run a brief test run to make sure the equipment is in operating order.

Frank of Florida Kitchen Pros says “a well-maintained fryer cleaning not only produces tastier food but also saves you money in the long run by avoiding frequent equipment breakdowns.”
Although cleaning a deep fryer cleaning can seem like a difficult chore, it is far simpler if you divide it into reasonable sections. Maintaining a good functioning kitchen and great cuisine every time depends on keeping fryer cleaning maintenance current.
Florida Kitchen Pros is ready to assist you whether your search is for more direction, advice, or professional aid! Frank and his staff specialize in deep cleaning and maintenance of commercial kitchens. Get in touch right now to maintain flawless condition of your kitchen tools.




Florida Kitchen Pros believes in years of experience in the commercial Kitchen cleaning industry that keeping and maintaining your commercial kitchen safe and clean is essential and very important for the well-being of customers and staff.